
Anime Shop Simulator Shop Layout
Aisle flow, shelf types, checkout queues, and why wallpaper should never beat a walkable restock path.
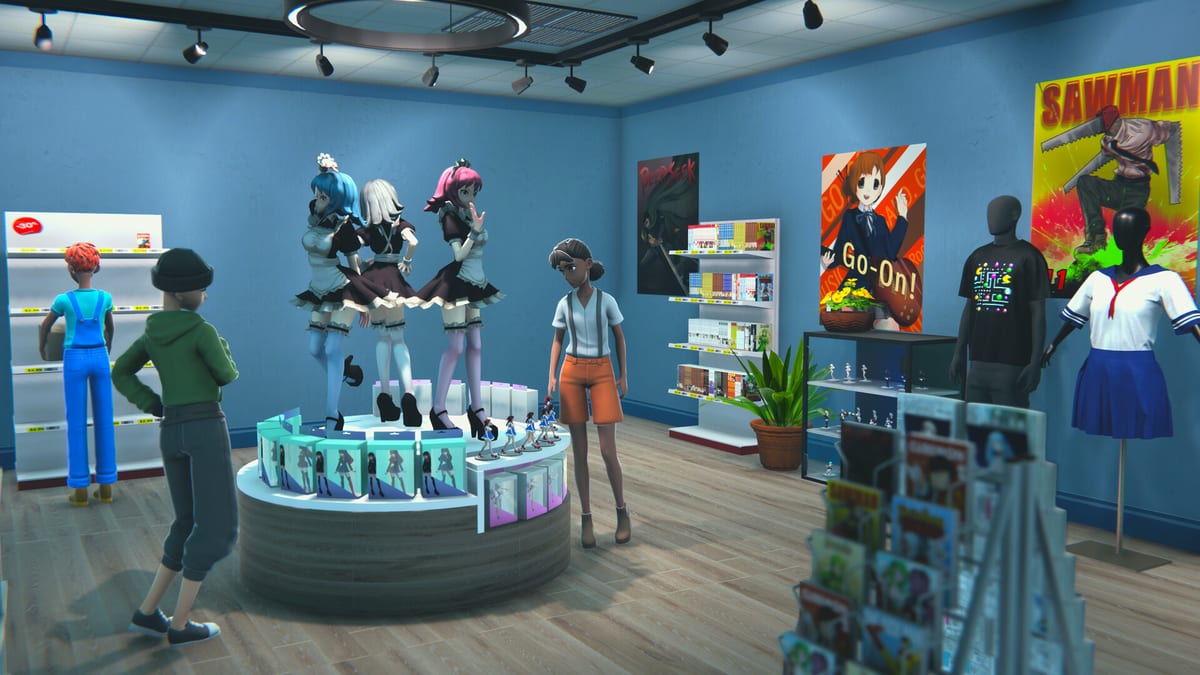
Layout is the silent profit skill in Anime Shop Simulator. You are not painting a dollhouse; you are building a path from door to manga to figures to cards to the till, with a second path from stockroom to every facing. The February 2026 demo only gives you a starter room plus a back stock area (and some unused upstairs teases), but the habits you learn there are the ones that will matter when expansion opens at the 11 September 2026 launch.
Pair this page with Getting Started so you do not rearrange an empty shop, and with controls so every extra meter is extra clicks.
Aisle flow from door to register
Guests spawn or enter toward the front. They want to see product immediately, pick a run, then queue without dead-ending. A layout that works in playtests:
- Door run: manga or another dense, cheap, face-out product. It looks like a shop even when the figure budget is thin.
- Middle island or wall: figures and boxed goods at eye height. These are the “I came in for a poster and left with a statue” SKUs.
- Low dense bay near the queue: booster packs, singles, pins, keychains. Hands are already idle in line.
- Register with a straight approach and room for two bodies so a restocker can slip past.
If a guest has to walk around a pallet of dakimakura to see the counter, you have built a maze. Keep aisles walkable — wide enough for a customer and a staffer with a box. In four-player co-op that width is not optional; it is how you avoid a cartoon pile-up at the manga endcap.
Face fixtures toward the path, not toward the wall you think looks cinematic. Screenshots that hide the register behind a poster wall are how you lose impulse sales.
Shelf types and product height
Not every fixture takes every SKU. Demo play is full of people trying to seat a figure on a book depth or a booster on a riser that wants apparel. Read the highlight. Group by form factor:
- Manga / print: long runs, consistent height, easy to restock in stacks. Put these where you will refill ten times an hour.
- Figures: need stable, visible shelves. Eye level sells; ankle level becomes storage pretending to be retail.
- Boosters and wrapped cards: dense and rectangular. Low shelves or dedicated card furniture keep boxes from looking like clutter on a figure riser.
- Apparel: needs hanging or folded depth. Do not mix it into the manga spine just because the license unlocked.
- Dakimakura / oversized: huge footprints. They belong on an endcap or a wall with ID-check awareness, never in the primary walking lane. See special clients for the service side.
- Pins and keychains: tiny. They disappear on a deep book shelf. Put them on shallow impulse real estate.
Height is a restock tool. Anything you refill constantly should not require a full camera tilt and a squat animation if the game gives you a chest-height option. Your future self during a rush will thank you.
When you unlock more of the products tier list, rebuild fixtures around what actually sells, not around what looked cool in the trailer. Sell-through beats symmetry.
Checkout queue and impulse racks
The register is a piece of furniture with a queue attached. Give it:
- A straight inbound lane with no shelf corner stabbing the camera.
- Impulse product within a step of the waiting spot: cheap packs, pins, maybe a face-out volume.
- Space behind the cashier so a second player can grab change or a bag without walking through the guest.
- A sightline to the door. Shoplifting is not the headline of this sim, but empty bays and lost guests are.
If you add a TCG table for duels (the demo’s “place the game table” beat in completionist runs), do not put it in the queue. Duels are downtime between customers, covered in TCG cards. A table in the inbound lane turns a tournament into a blockage — which is also why events tell you to stage signings off the main path.
One register is enough until the current one has a permanent line and you have a second body to staff it. Buying a counter you cannot stand at is decoration.
Decoration versus throughput
Name, wallpaper, posters, and props are real features. They are also how demo shops go broke. Decoration does three jobs:
- Make the space readable (contrast behind dark figures, brighter walls in a dim corner).
- Signal “this is an anime shop” for your own brain and for screenshots.
- Eventually support popularity / vibe systems at launch.
It does not replace facings. A fully papered room with three products is a museum. Spend decoration money after the door-to-till path is stocked and the pricing on those SKUs is not a guess.
Rules of thumb from messy playtests:
- Wallpaper before clutter props. Color is cheap visual order.
- Posters on walls that are not shelf backs. Covering a fixture you need to restock is a tax.
- Floor props only on dead squares, never on the restock path from the stockroom door.
- Sign changes that cost about a hundred dollars in the demo can wait until the till is printing.
If you are playing co-op, appoint one person as “decorator” only after the rush, the way a real store puts planograms after close — not during.
Expansion rooms and storage
The starter stockroom is the best room you have. It should hold incoming cartons, trash flow, and overflow that is not pretty enough for the floor. Do not fill it with display figures “for the vibe.” That is how you walk around your own inventory.
Expand when:
- Every legal fixture in the current room is full and selling.
- You can afford to fill at least half of the new room on day one.
- You have a plan for the path back to the register, not just a plan for more wallpaper.
- In co-op, someone is willing to own the new wing so it does not become a dead museum.
Upstairs or behind-a-door teases in the demo are not a homework assignment. Walking distance is a cost. A bigger shop with the same four licenses is a worse shop.
When events arrive, leave a flex rectangle — empty floor that can host a signing table or a tournament cluster without deleting the manga run. That rectangle is cheaper to reserve now than to demolish later. Details sit on events.
Co-op traffic rules
Four players turn layout into traffic engineering.
- Stockroom door is a one-way during rushes if you can help it: in with closed boxes, out with units, trash stays inside until a lull.
- Call turns at the register corner.
- Put the computer where a player can use it without standing in the queue camera.
- Assign bays: manga owner, figure owner, card owner, so two people do not restock the same hole.
Role cards on co-op and co-op roles assume this geometry. If your shop is a knot, no role split will save the shift.
Build the demo room as if you will still be using it in September: door story, eye-level figures, low cards, clear till, sacred restock alley. Then, and only then, hang the posters.
Frequently Asked Questions
Quick answers for demo players and launch-day shopkeepers.
What should sit nearest the door in Anime Shop Simulator?
A dense, easy-to-restock run — usually manga — so the shop looks alive and you can refill it without a ladder of extra licenses. Figures can take the eye-level wall behind that run.
Where do booster packs belong?
On a low, dense bay next to the queue or a dedicated card fixture, not on figure risers. See TCG cards for how much sealed product to leave on that bay.
Should I decorate before I stock?
No. Wallpaper and posters wait until facings are full and selling. Decoration money in the demo is easier to waste than manga money.
When is expansion worth buying?
When the current room is full, profitable, and you can stock the new space immediately. Empty square meters are just extra walking. Getting Started covers the cash test.
How wide should aisles be for co-op?
Wide enough for a customer plus a player carrying a box. Four-player games fail in pretty mazes. Traffic rules are in the co-op guide.
Where should I put a TCG table or signing setup?
Off the inbound queue, on a flex rectangle you kept empty. Do not host events in the only walking lane to the register.